Материал: surgical knot tying manual covidien
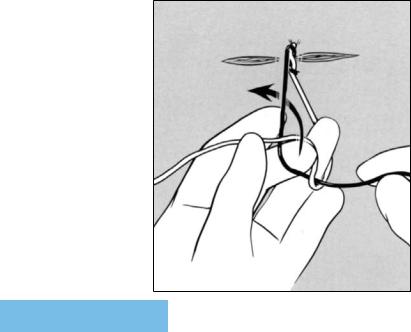
Step 8.
Form the Second Suture Loop
With continued supination of the wrist, the tips of the left long and ring fingers advance their free suture end under the suture end held by the right hand to form a suture loop.
Step 9.
Flex Long Finger Toward the Free Suture End
Continued flexion (arrow) of the distal phalanx of the left long finger allows the tip of the finger to pass beneath the free suture end held between the tips of the left thumb and index finger.
77
IX. one-hand tie technique — square knot (1=1) formation of the second throw (cont’d)
Step 10.
Begin Withdrawal of the
Free Suture End Down Through the Suture Loop
Once the dorsum of the distal phalanx of the left long finger is beneath the free suture end held between the tips of the left thumb and index finger, extension of the distal
phalanx of the long finger begins to withdraw (arrow) the suture end down through the loop. For the left long finger to withdraw the entire free suture end down through the loop, the left thumb and index finger must release their grip of the suture. During this interval, tension cannot be maintained continually on the first throw, allowing the first-throw, suture loop to widen with subse-
quent partial separation of the wound edges.
78
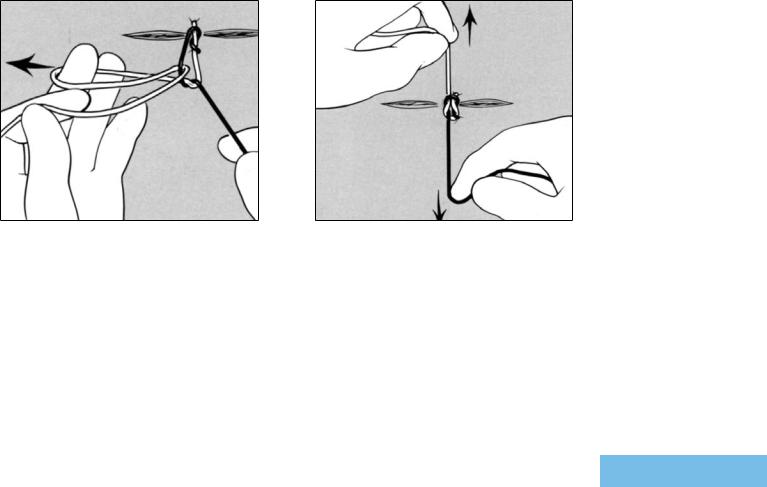
Step 11.
Complete Withdrawal of the Free Suture End Down Through the Suture Loop to Form Second, Single-Wrap Throw
During withdrawal (arrow) of the free suture end through the loop, it is held loosely between the tips of the left long and ring fingers. This loose grasp (key pinch) between the ulnar side of the distal phalanx of the left long finger and the radial side of the distal phalanx of the left ring finger does not allow constant tension to be maintained on this suture end. For the left long and ring fingers to withdraw (arrow) the entire suture end through the loop, the tips of the left thumb and index finger must release the suture.
Step 12.
Advance Square Knot (1=1) to Wound Surface
The second throw is advanced and set against the first throw by applying tension in a direction (arrows) perpendicular to that of the wound. Advancement of the second throw is complete when the second throw contacts the first throw to form a square (1=1) knot. Ideally, the surgeon should be able to advance the
two-throw, square knot to allow meticulous approximation of the wound edges. Once exact approximation of the wound edges is accomplished, the surgeon will construct a knot with a sufficient number of throws and 3mm cut “ears” so that knot security is determined by knot breakage, rather than by slippage.3
79

X.instrument-tie technique — square knot (1=1) formation of the first throw (cont’d)
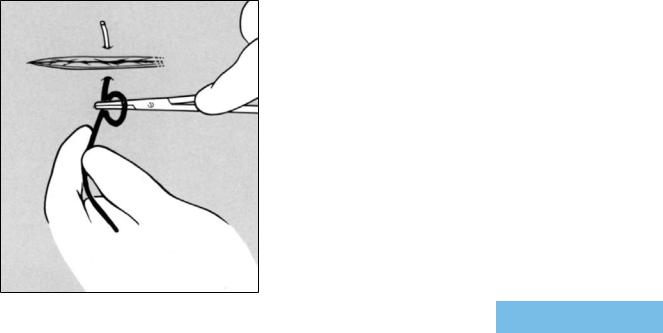
Step 1.
Position the Needle Holder
The instrument tie is performed with a needle holder held in the surgeon’s right hand.
The left hand holds the fixed suture end between the tips of the thumb and index finger. The needle holder is positioned perpendicular to and above the fixed suture end. By keeping the length of the free suture end relatively short (<2 cm), it is easy to form (arrow) suture loops as well as to save suture material. Because the needle holder passes the free suture end through the suture loop, knot construction can be safely accomplished without detaching the needle from the fixed suture end.
80
Step 2.
Form the First Suture Loop
The fixed suture end held by the left hand is wrapped over and around the needle holder jaws to form the first suture loop. (If the suture is wrapped twice around the needle holder jaws, the first, double-wrap throw of the surgeon’s knot square will be formed. A double-wrap, first throw displays
a greater resistance to slippage than a singlewrap throw, accounting for its frequent use in instrument ties in wounds subjected to strong, static skin tensions).
81