Материал: surgical knot tying manual covidien
IX. one-hand tie technique — square knot (1=1) formation of the first throw
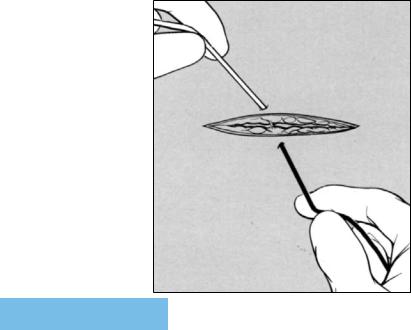
Step 1.
Hold Suture Ends
The suture end exiting from the side of the wound farther from the surgeon is grasped between the tips of the distal phalanges of the left thumb and index finger (tip-to-tip pinch), while the tips of the distal phalanges of the right thumb and index finger grasp the suture end
exiting from the closer side of the wound. The grasped fingers apply constant tension to the suture ends. The security of this tip-to-tip pinch of the suture ends can be enhanced by grasping the suture ends between the tips of the long fingers, ring fingers, small fingers and the palm of each hand (grip activity).
72
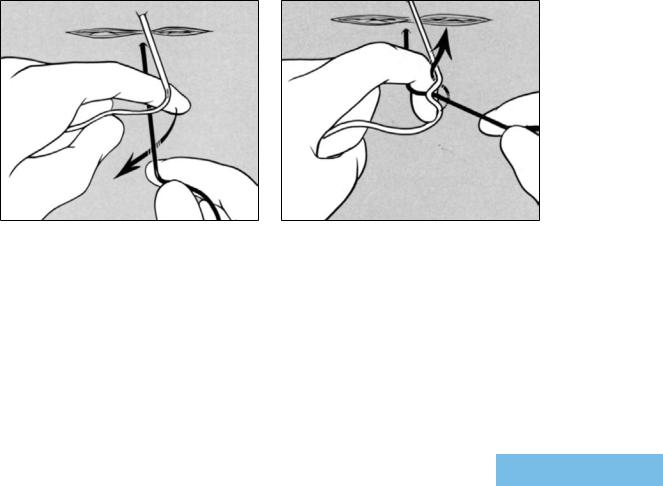
Step 2.
Form the First Suture Loop
The first throw of the square knot is initiated by the tip of the left index finger that passes its free suture end over the fixed suture end held between the tips of the right index finger and thumb.
The tip of the left index finger begins to flex around (arrow) the fixed suture end held by the right hand. Note that the left hand forms the suture loop and passes the free suture end through the suture loop. Consequently, knot construction can be safely accomplished without detaching
the needle from the fixed suture end.
Step 3.
Pass Index Finger Down into The Suture Loop
As the index finger passes into the suture loop, flexion of the tip of the left index finger continues until the dorsal surface of its distal phalanx contacts the free suture end held by the left hand. After the free suture end rests on the dorsal surface of the tip of the left index finger, extension of the finger will begin withdrawal (arrow) of the free suture end up through the suture loop.
73
IX. one-hand tie technique — square knot (1=1) formation of the first throw (cont’d)
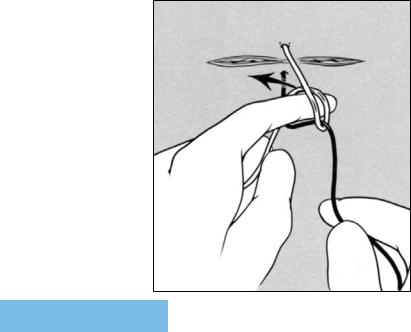
Step 4.
Begin Withdrawal of Free Suture End Up Through the Suture Loop
Extension of the distal phalanx of the left index finger brings the suture end held by the left hand upward (arrow) through the loop.
74

Step 5.
Pass Free Suture End Up Through the Suture Loop
For the left index finger to bring the entire suture end up (arrow) through the loop, the left hand must release its grip of the suture. During this interval, tension cannot be maintained continually on the first throw, allowing the first-throw suture loop to widen, with subsequent partial separation of the wound edges.
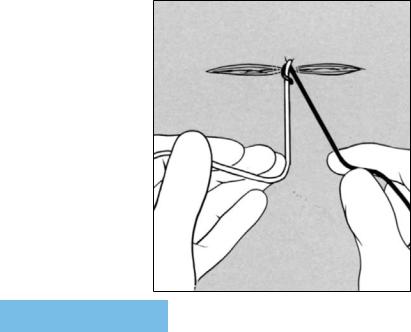
Step 6.
Advance First Single-Wrap Throw to Wound Surface
With the suture ends grasped in the palms of the surgeon’s hands, the tips of the thumbs and index fingers position the suture ends in a direction (arrows) perpendicular to that of the wound. The surgeon applies constant tension to the suture ends, which advances the first, single-wrap throw of the square knot to the surface of the wound. Advancement of
the first throw is complete when the divided skin edges of the mid-portion of the wound are approximated.
75
IX. one-hand tie technique — square knot (1=1) formation of the second throw
Step 7.
Begin Formation of the Second Suture Loop
While grasping the suture end exiting from the farther side of the wound between the tips of the left thumb and index finger, the surgeon supinates the left wrist so that the free suture end is positioned over the tips of the long, ring and
small fingers.
76