Материал: surgical knot tying manual covidien
Step 6.
Apply Tension to the Straight, Taut Suture End
The first throw of the slip knot is completed by first applying tension (arrow) to the suture held by the left hand causing the suture end to be straight and taut. The suture end held by the right hand forms a loop around the straight, taut suture held by the left hand.
Step 7.
Advance First Throw to Wound
The tip of the right index finger slides (arrow) the loop along the straight, taut suture end held
by the left hand until the loop contacts the wound. Advancement of the first throw is complete when the divided skin edges of the mid-portion of the wound are approximated.
67

VIII. two-hand tie techniques — slip knot (S=S) formation of the second throw
Step 8.
Begin Formation of
Second Suture Loop
The dorsum of the tip of the left thumb is passed under its suture end in order to direct it beneath (arrow) the other suture end that is held by the right hand. During formation of the second throw, constant tension is applied to the suture ends to maintain wound approximation.
68
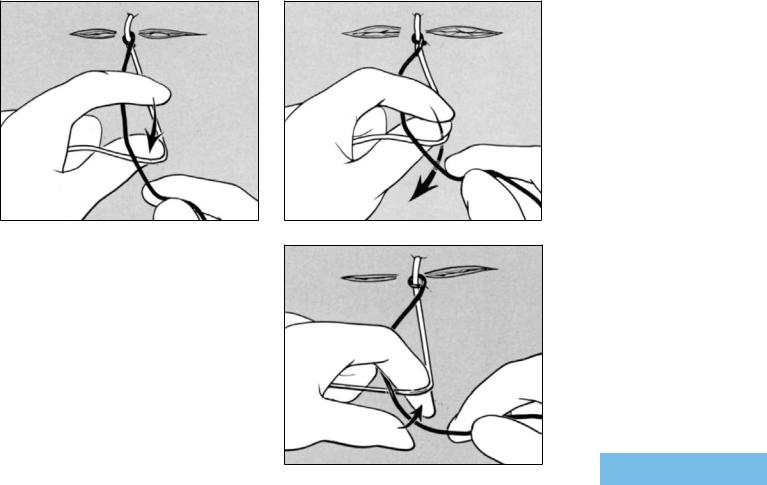
Step 9.
Form the Second Suture Loop
The left thumb advances its suture end beneath the other suture end to form a suture loop. The tip of the left index finger passes down (arrow) to touch the left thumb.
Step 10.
Pass Index Finger Down Through the Suture Loop
After the tip of the left index finger contacts the tip of the left thumb (tip- to-tip pinch), both are advanced down (arrow) through the suture loop so that only the tip of the left index finger remains in the suture loop.
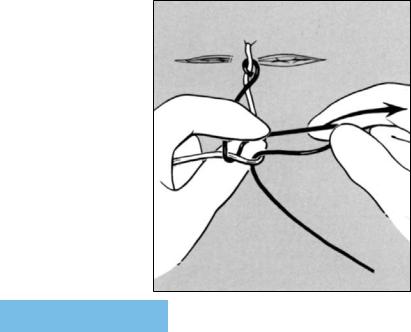
Step 11.
Pass Free Suture
End Under the
Suture Loop
The free suture end held by the right hand is passed under the suture loop to be positioned (arrow) between the tips of the left index finger and thumb.
69
VIII. two-hand tie techniques — slip knot (S=S) formation of the second throw (cont’d)
Step 12.
Pass Free Suture End Up Through the Suture Loop
The free suture end grasped between the tips of the left thumb and index finger is advanced upward through the suture loop. The right hand releases its free suture end to allows its passage through the suture loop, after which it regrasps the free suture end to withdraw (arrow) it through the suture loop.
70
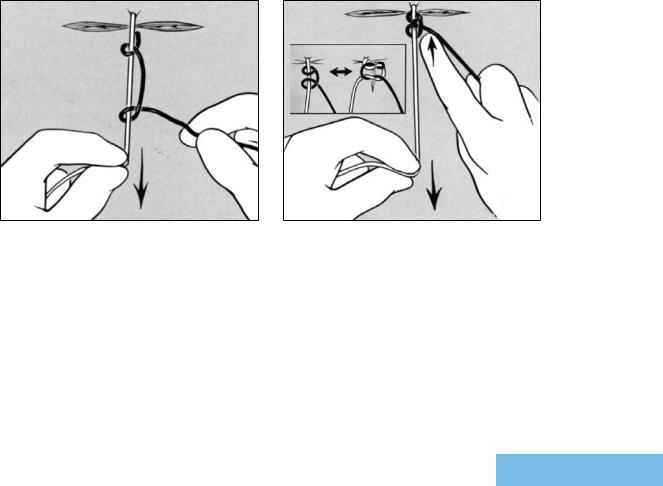
Step 13.
Apply Tension to the Straight, Taut Suture End to Form Second Throw
The tension applied (arrow) to the suture end held by the left hand causes this suture end to become straight and taut. The suture end held by the right hand forms a second loop around the straight, taut suture end held by the left hand.
Step 14.
Advance Slip Knot (S=S) to Wound Surface
The tip of the right index finger slides (arrow) this second throw against the first throw, completing the slip knot (S=S), while the left hand maintains tension (arrow) on its suture end. The slip knot will become a square knot by applying tension to the suture end held
by the right hand. (Insert) The square knot can be converted to a slip knot by applying tension primarily to one suture end.
71