Материал: surgical knot tying manual covidien
hand tie
(cont’d)
technique is that a surgeon who ties his/her own knots by the two-hand technique during wound closure can hold the needle holder in his/her right hand during knot construction. If one desired to learn to tie knots using the left hand to manipulate the free end of the suture, study the illustrations in a mirror.
Using the one-hand tie, one hand forms the suture loop while manipulating the free suture end. The other hand merely holds the mother suture end taut. Most surgeons prefer to manipulate the free suture end with their left hand, allowing them to hold the needle holder in their right hand while they construct knots with their left hand.
There are several important recommendations for selecting a knot tying technique. First, position the hands on each side of and parallel to the suture loop. Second, grasp the appropriate suture ends and form the suture loop, without exchanging suture ends between the hands. While exchanging suture ends between the hands forms a triangular-shaped suture loop, it is an unnecessary step that wastes valuable time. Third pass the free suture end, rather than the fixed suture end, through the suture loop. Finally, reverse the position of the hands after
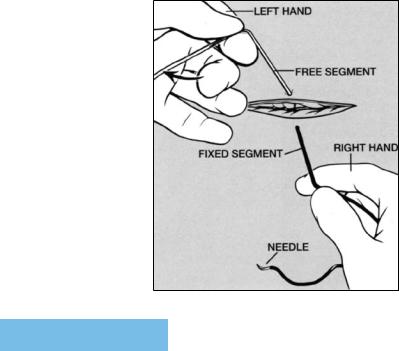
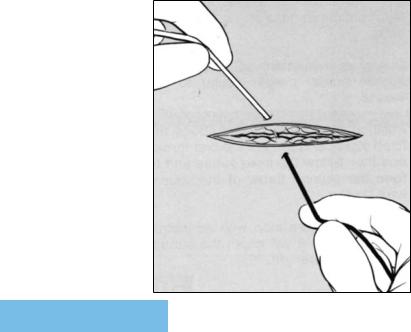
Figure 9. Standard format for illustrating the knot tying technique.
42

each additional throw. Most of the knot tying techniques in this manual comply with these recommendations. However, it is important to point out that the fixed end of the suture is being passed through the suture loops in the two-hand ties. Consequently, the surgeon must detach the needle from the fixed suture end before a two-hand tie.
A standard format for illustrating surgical knot tying techniques has been used throughout the manual (Figure 9). A horizontal incision is pictured in the top of each illustration. Because the wound edges are subjected to static tensions, there is retraction of the wound edges, with exposure of the underlying tissue. The surgeon is standing facing the wound from the bottom of each illustration. Because the surgeon usually passes the needle swaged to a suture toward himself (herself), the fixed end (black) of the suture with its attached needle enters the farther side of the mid-portion of the wound and exits from the side of the wound closer to the surgeon. The free end of the suture is white to facilitate illustration of the knot tying technique. The suture end (white) farther from the surgeon is grasped between the tips of the distal phalanges of the left thumb and index finger (tip-to-tip pinch). The tips of the distal phalanges of the thumb and index finger of the right hand grasp the suture end (black) exiting from the wound edge closer to the surgeon. The grasped fingers apply constant tension to the suture ends. The security of this tip-to-tip pinch can be enhanced by grasping the suture ends between the tips of the long fingers, ring fingers, small fingers, and the palm of each hand (grip activity).
The tying of square, slip, and surgeon’s knots using manual and instrument-tying techniques are illustrated in Sections VIII-X. The technique of tying slip knots has been included in the manual because it is an excellent method to approximate temporarily the edges of wounds subjected to strong tensions In fact, a slip knot has greater holding power than either a single-wrap or double-wrap throw.22 Once there is meticulous approximation of wound edges, the slip knot can be converted to a square knot, after which a sufficient number of throws are added to the knot to ensure knot security.
43

VII. essential elements
DO
1.Pass the surgical needle swaged to a suture through the wound edges in a direction toward you.
2.Construct a two-throw square knot that can be advanced to the wound edge, providing a preview of the ultimate apposition of the wound edges.
3.Approximate the edges of the divided tissue without strangulating the tissue encircled by the suture loop.
4.Once meticulous apposition of the wound edges is achieved, construct a knot that has has sufficient number of throws that allow it to fail by breakage rather than by slippage.
5.Position your hands on each side and parallel to the suture loop.
DON’T
1.Pass the surgical needle swaged to a suture through the wound edge in a direction away from you.
2.Construct a secure knot that cannot be advanced to the wound edges.
3.Apply frictional forces (sawing) between the suture “ears” during knot
construction that damage the suture and reduce its strength.
4.Add further throws to a knot that has the required number of throws for knot security.
5.Position your hands perpendicular to the suture loop.
44

DO
6.Apply opposing forces to the knot “ears” that are equal in magnitude and in a plane parallel to that of the wound surface.
7.After each throw, reverse the position of your hands that apply tension to the suture ends.
8.Apply constant force slowly to the “ears” of each throw of the knot.
9.Use the two-hand tie technique to maintain continuous tension on suture ends.
10.During an instrument tie, position the needle holder parallel to the wound.
11.Position the needle holder above the fixed suture end to form the first and second suture throws of a square (1=1) knot.
12.Clamp only the free end of the suture during the instrument tie.
DON’T
6.Exert unequal levels of tension to the suture ends that convert the knot into a slip knot.
7.Maintain the same position of your hands after each additional throw.
8.Apply a constant force rapidly to the “ears” of each throw of the knot.
9.Use the one-hand tie technique to maintain continuous tension of the suture ends.
10.During an instrument tie, position the needle holder perpendicular to the wound.
11.Position the needle holder above the fixed suture end to form the first throw, and then below the fixed suture end to form the second throw of the square knot (1=1).
12.Clamp the suture loop with an instru-
ment because it will crush the suture, reducing its strength.30-32
45
VIII. two-hand tie techniques — square knot (1=1) formation of the first throw
Step 1.
Hold Suture Ends
The suture end exiting from the side of the wound farther from the surgeon is grasped between the tips of the distal phalanges of the left thumb and index finger (tip-to-tip pinch), while the tips of the distal phalanges of the right thumb and index finger grasp the suture end
exiting from the closer side of the wound. The grasped fingers apply constant tension to the suture ends. The security of this tip-to-tip pinch of the suture
ends can be enhanced by grasping the suture ends between the tips of the long fingers, ring fingers, small fingers and the palm of each hand (grip activity).
46