Материал: m912201e
Overview of the Resources |
• 239 |
Watch and Receipt Manager |
|
|
|
6.7 Watch and Receipt Manager
6.7.1 Watch and Receipt Manager
With the help of the Watch and Receipt Manager you can view the values of selected variables. The Watch and Receipt Manager also makes it possible to preset the variables with definite values and transfer them as a group to the PLC ('Write Receipt'). In the same way, current PLC values can be read into and stored in the Watch and Receipt Manager ('Read Receipt'). These functions are helpful, for example, for setting and entering of control parameters.
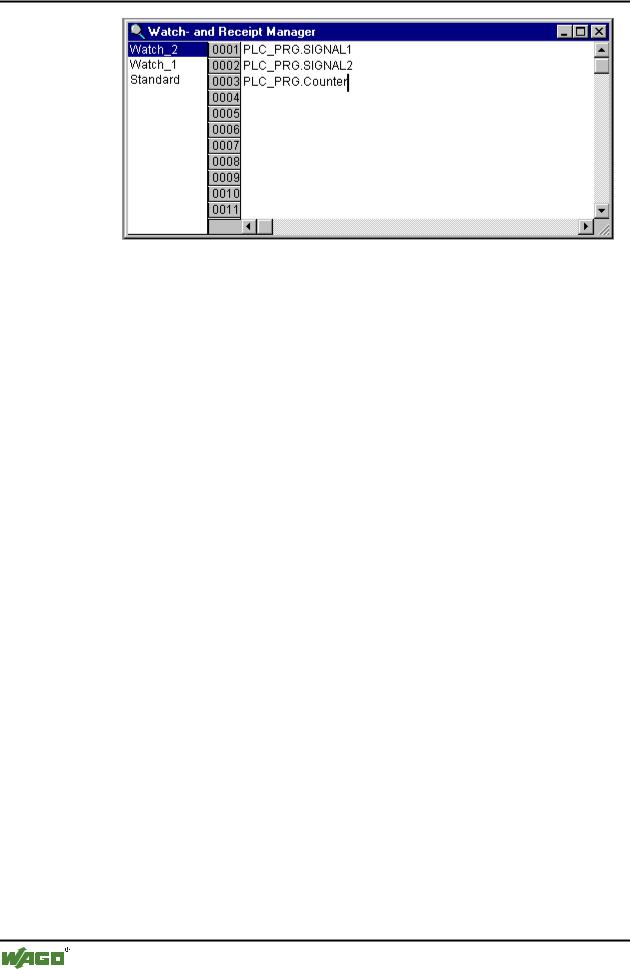
All watch lists created ('Insert' 'New Watch List') are indicated in the left column of the Watch and Receipt Manager. These lists can be selected with a mouse click or an arrow key. In the right area of the Watch and Receipt Manager the variables applicable at any given time are indicated.
In order to work with the Watch and Receipt Manager, open the object for the
 Watch and Receipt Manager in the Resources register card in the Object Organizer.
6.7.2 Watch and Receipt Manager in the Offline Mode
In Offline Mode, you can create several watch lists in the Watch and Receipt Manager using the 'Insert' 'New Watch List'.
For inputting the variables to be watched, you can call up a list of all variables with the Input Assistant, or you can enter the variables with the keyboard, according to the following notation:
<POUName>.<Variable Name>
With global variables, the POU Name is left out. You begin with a point. The variable name can, once again, contain multiple levels. Addresses can be entered directly.
Example of a multiple-level variable:
PLC_PRG.Instance1.Instance2.Structure.Componentname
Example of a global variable:
.global1.component1
x Watch and Receipt Manager in the Offline Mode
WAGO-I/O-SYSTEM 759 WAGO-I/O-PRO 32
240 • Overview of the Resources
Watch and Receipt Manager
The variables in the watch list can be preset with constant values. That means that in Online mode you can use the 'Extras' 'Write Receipt' command to write these values into the variables. To do to do must use := to assign the constant value of the variable:
Example:
PLC_PRG.TIMER:=50
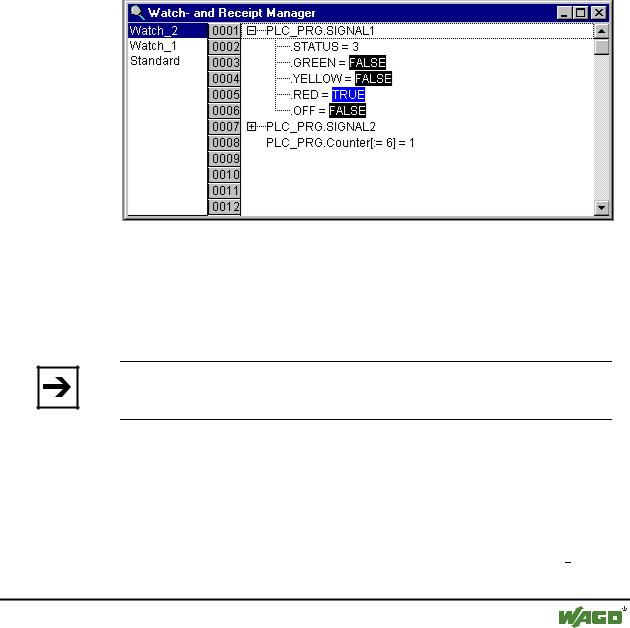
In the example, the PLC_PRG.COUNTER variable is preset with the value 6
6.7.3 'Insert' 'New Watch List'
With this command a new watch list can be inserted into the Watch and Receipt Manager. Enter the desired name for the watch list in the dialog box that appears.
6.7.4 'Extras' 'Rename Watch List'
With this command you can change the name of a watch list in the Watch and Receipt Manager.
In the dialog box that appears, enter the new name of the watch list.
6.7.5 'Extras' 'Save Watch List'
With this command you can save a watch list. The dialog box for saving a file is opened. The file name is preset with the name of the watch list and is given the extension "*.wtc".
The saved watch list can be loaded again with 'Extras' 'Load Watch List'.
6.7.6 'Extras' 'Load Watch List'
With this command you can reload a saved watch list. The dialog box is opened for opening a file. Select the desired file with the "*.wtc" extension. In the dialog box that appears, you can give the watch list a new name. The file name is preset without an extension.
WAGO-I/O-SYSTEM 759 WAGO-I/O-PRO 32
Overview of the Resources |
• 241 |
Watch and Receipt Manager |
|
|
|
With 'Extras' 'Save Watch List', you can save a watch list.
6.7.7 Watch and Receipt Manager in the Online Mode
In Online mode, the values of the entered variables are indicated.
Structured values (arrays, structures, or instances of function blocks) are marked by a plus sign in front of the identifier. By clicking the plus sign with the mouse or by pressing <Enter>, the variable is opened up or closed.If a function block variable is marked in the watch list, the associated context menu is expanded to include the two menu items 'Zoom' and 'Open instance'.
In order to input new variables, you can turn off the display by using the 'Extras' 'Active Monitoring' command. After the variables have been entered, you can use the same command again to activate the display of the values.
x Watch and Receipt Manager in the Online Mode
In the Offline Mode you can preset variables with constant values (through inputting := <value> after the variable). In the Online Mode, these values can now be written into the variables, using the 'Extras' 'Write Receipt' command.
With the 'Extras' 'Read Receipt' command you can replace the presetting of the variable with the present value of the variable.
Note:
Only those values the watch list are loaded which was selected in the
Watch and Receipt Manager!
6.7.8 'Extra' 'Monitoring Active'
With this command at the Watch and Receipt Manager in the Online mode, the display is turned on or off. If the display is active, a check ( ) will appear in front of the menu item.
In order to enter new variables or to preset a value (see Offline Mode), the display must be turned off through the command. After the variables have
WAGO-I/O-SYSTEM 759 WAGO-I/O-PRO 32

242 • Overview of the Resources
Watch and Receipt Manager
been entered, you can use the same command again to activate the display of the values.
6.7.9 'Extras' 'Write Receipt'
With this command in the Online Mode of the Watch and Receipt Manager you can write the preset values (see Offline Mode) into the variables.
Note:
Only those values of the watch list are loaded which was selected in the
Watch and Receipt Manager!
6.7.10'Extras' 'Read Receipt'
With the command, in the Online Mode of the Watch and Receipt Manager, you can replace the presetting of the variables (see Offline Mode) with the present value of the variables.
Example:
PLC_PRG.Counter [:= <present value>] = <present value>
Note:
Only the values of that watch list are loaded which was selected in the
Watch and Receipt Manager!
6.7.11Force values
In the Watch and Receipt Manager you can also 'Force values' and 'Write values'. If you click on the respective variable value, then a dialog box opens, in which you can enter the new value of the variable. Changed variables appear in red in the Watch and Receipt Manager.
WAGO-I/O-SYSTEM 759 WAGO-I/O-PRO 32
Library Manager • 243
Using the Library Manager
7 Library Manager
The library manager shows all libraries that are connected with the current project. The POUs, data types, and global variables of the libraries can be used the same way as user-defined POUs, data types, and global variables.
The library manager is opened with the 'Window' 'Library Manager' command. Information concerning included libraries is stored with the project.
x Library Manager
7.1 Using the Library Manager
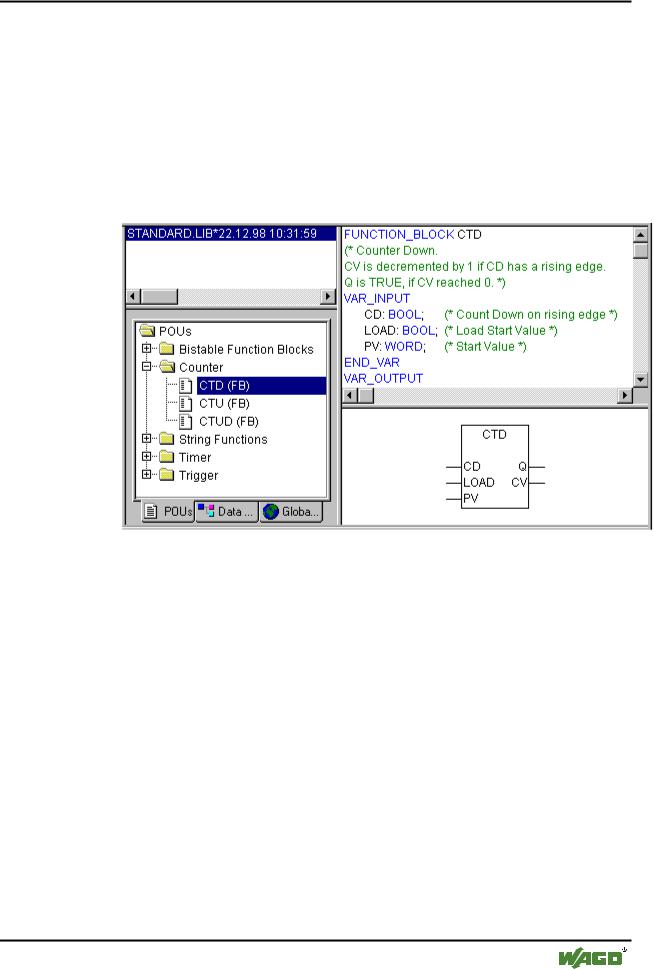
The window of the library manager is divided into three or four areas by screen dividers. The libraries attached to the project are listed in the upper left area.
In the area below that, depending on which register card has been selected, there is a listing of the POUs , Data types, Visualizations or Global variables of the library selected in the upper area.
Folders are opened and closed by doubleclicking the line or pressing <Enter>. There is a plus sign in front of closed folders, and a minus sign in front of opened folders.
If a POU is selected by clicking the mouse or selecting with the arrow keys then the declaration of the POU will appear in the upper right area of the library manager; and in the lower right is the graphic display in the form of a black box with inputs and outputs.
With data types and global variables, the declaration is displayed in the right area of the library manager.
WAGO-I/O-SYSTEM 759 WAGO-I/O-PRO 32