Материал: m933302e
2 - The Visualization Editor in CoDeSys
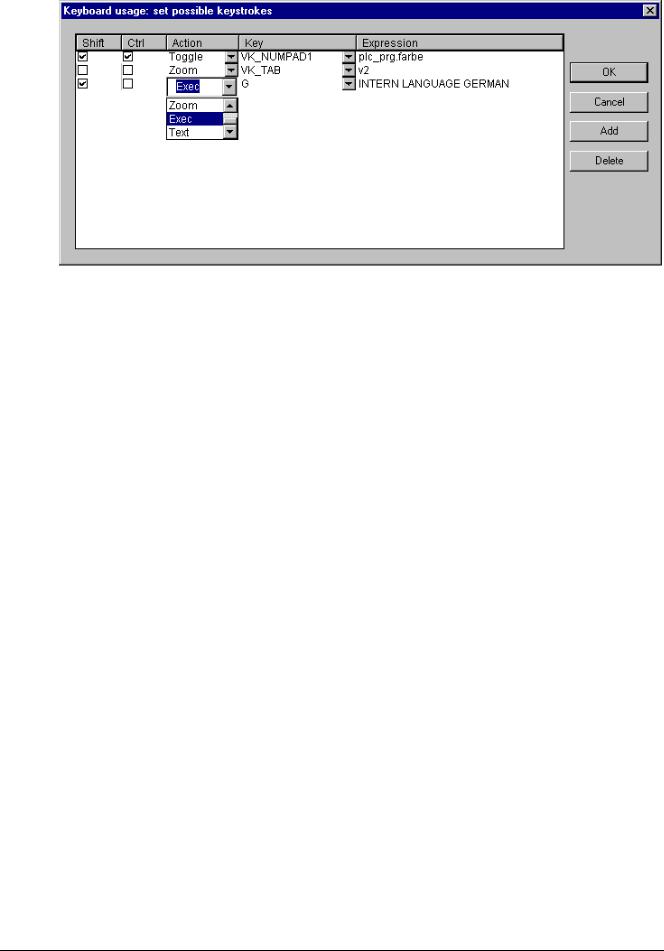
Dialog 'Keyboard usage: set possible keystrokes'
In column Key a selection list offers the following keys to which an action can get assigned:
VK_TAB |
Tab-Key |
VK_RETURN |
Enter-Key |
VK_SPACE |
Space-Key |
VK_ESCAPE |
Esc-Key |
VK_INSERT |
Insert-Key |
VK_DELETE |
Delete-Key |
VK_HOME |
Pos1-Key |
VK_END |
Ende-Key |
VK_PRIOR |
Bild ()-Key |
VK_NEXT |
Bild (↓)-Key |
VK_LEFT |
Arrow-Key (←) |
VK_RIGHT |
Arrow-Key (→) |
VK_UP |
Arrow-Key () |
VK_DOWN |
Arrow-Key (↓) |
VK_F1-VK_F12 |
Function keys F1 to F12 |
0-9 |
Keys 0 to 9 |
A-Z |
Keys A to Z |
VK_NUMPAD0 - |
Keys 0 to 9 of the numeric keypad |
VK_NUMPAD9 |
|
VK_MULTIPLY |
Key* of the numeric keypad |
VK_ADD |
Key+ of the numeric keypad |
VK_SUBTRACT |
Keyof the numeric keypad |
VK_DIVIDE |
Key÷ of the numeric keypad |
2-50 |
The CoDeSys Visualization |

2 - The Visualization Editor in CoDeSys
In the columns Shift and Ctrl you can add the <Shift>- and/or the <Ctrl>-key to the already chosen key, so that a key combination will result.
In column Action you define what should happen as soon as the key (combination) will be pressed. Select the desired action from the list and insert an appropriate expression. See in the following the available actions and valid expressions, corresponding to those which can be set in the configuration dialog of category 'Input':
Action |
Meaning |
Expression |
Toggle |
Toggle variable |
Variable, e.g."plc_prg.tvar" |
Tap true |
Tap variable (set to TRUE) |
Program variable, e.g. "plc_prg.svar" |
Tap false Tap variable (set to FALSE) Program variable, e.g. "plc_prg.xvar"
Zoom |
Zoom to Vis. |
Name of the visualization object to which you want to jump, |
|
|
e.g. "Visu1" |
Exec |
Execute program |
Name of the executable file, e.g. "notepad C:\help.txt" |
|
|
(Notepad will start and open the file help.txt) |
Text |
Text input of variable |
Number of the element for which the text input is to be |
|
'Textdisplay' |
configured, e.g. "#2" (Display of element numbers can be |
|
|
switched on in 'Extras' 'Settings'; also see 'Elementlist...') |
In column Expression you must enter – depending on the type of action – either a variable name, a INTERN-command, a visualization name of a text string, exactly like you would do in the configuration dialog of category 'Input' for the corresponding visualization element.
Use button Add to add another empty line at the end of the table. Use the Delete button to remove the line where the cursor is positioned currently. OK resp. Cancel will save resp. not save the done settings and close the dialog.
The keyboard usage can be configured separately for each visualization object. Thus the same key (combination) can start different actions in different visualization.
Example:
The following key configurations have been done for the visualizations VIS_1 and VIS_2: VIS_1:
Shift |
Ctrl |
Action |
Key |
Expression |
|
|
|
|
|
|
|
x |
|
Toggle |
A |
PLC_PRG.automatic |
|
|
|
|
|
|
|
|
x |
Zoom |
Z |
VIS_2 |
|
|
|
|
|
|
VIS_2:
|
Shift |
Ctrl |
|
Action |
|
Key |
|
Expression |
|
|
|
|
|
|
|
|
|||||
|
|
|
|
|
|
|
|
|
|
|
|
|
|
|
Exec |
|
E |
|
INTERN |
LANGUAGE |
|
|
|
|
|
|
|
|
|
DEUTSCH |
|
|
|
|
|
|
|
|
|
|
|
|
|
|
|
x |
|
Zoom |
|
Z |
|
PLC_VISU |
|
|
|
|
|
|
|
|
|
|
|
|
|
If you now |
go |
online and |
set the |
focus to VIS_1, |
then pressing <Shift><A> will cause that variable |
|||||
PLC_PRG.automatic will be toggled. <Ctrl><Z> will cause a jump from Visu1 to VIS_2.
If VIS_2 is the active window, pressing key <E> will cause that the language within the visualization will switch to German. <Ctrl><Z> here will cause a jump to visualization PLC_VISU.
The CoDeSys Visualization |
2-51 |
2 - The Visualization Editor in CoDeSys
2.5Dynamic Texts
2.5.1Configuration
You can control dynamically which text will be displayed in a visualization element in online mode by using prefix-ID-combinations, each pointing to another text defined in a XML-file. Prefix and ID must be defined in the configuration dialogs of the visualization element, where the ID can be dynamically defined by using a project variable. The XML-file describing the assignment to a text, must be linked to the project. (see Chapter 2.5.2, XML-File for dynamic texts). This is done in the visualization settings dialog. The XML-file must have a certain format, the particular texts are listed below the according Prefix-ID-combination and a language code is added. Thus the text display not only can switch between different contents but also between different languages. The desired language can be selected as described above for the Language file in the 'Settings' dialog, category 'Language':
So in order to get a dynamic text display, the following entries have to be made in the different configuration dialogs of a visualization:
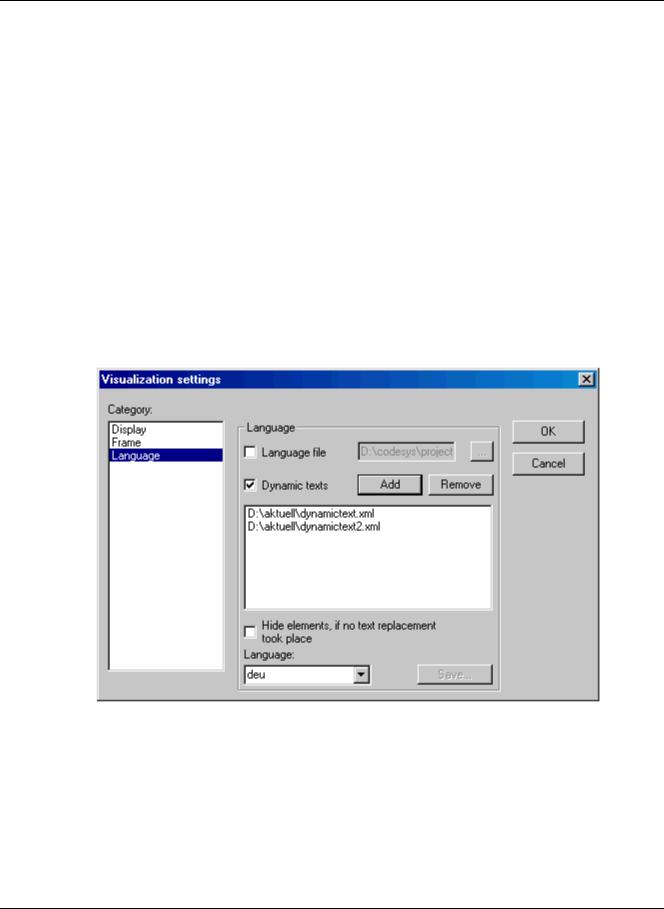
1. Link the XML-file(s): Dialog 'Settings' category Language:
Activate option Dynamic texts and press button Add, in order to link one or several XML-files, which are available on your system, to the project. The selected files will be listed in the window below the button. Press button Delete if you want to remove a selected file from the list. If you want to get displayed just those visualization elements, for which a dynamic text replacement is done, then activate option Hide elements, if no text replacement took place.
Selecting one of the language identifiers offered in the selection list at field Language will cause the display of that text versions (for the corresponding prefix-ID-combination) which are marked with that language identifier in the XML.-file.
Configuration dialog Settings, category Language, for dynamic texts
2. Define the ID in configuration dialog 'Variables' in field 'Textdisplay':
Enter here a value (number) resp. a project variable which should define the ID of a text (as used in the XML-file).
3. Define the text format in configuration dialog 'Text':
In the Content field, insert a placeholder "%<PREFIX>" at that position of the text, where you want to get displayed a dynamic text in online mode. Instead of "PREFIX" you can enter any desired string. See the description for the 'Text' configuration dialog.
2-52 |
The CoDeSys Visualization |

2 - The Visualization Editor in CoDeSys
For each prefix-ID-combination, which is found in a linked XML-file, the assigned text will be displayed in the visualization element in online mode. If no appropriate entry is found, no replacement will be done.
2.5.2XML-File for Dynamic Texts
For a description how to use dynamic texts in the visualization see chapter 2.5.1, 'Settings', category Language. The underlying file must be available in XML format (<file name>.xml). In this file texts are assigned to identifiers (which are a combination of a prefix and an ID), which can be entered in the configuration of a visualization element. Besides that a default language can be defined in a header section. See an example at the end of this chapter.
The descriptions in the xml-file are enclosed by tag <dynamic-text> and <\dynamic_text> which have to be entered at the beginning resp. end of the file.
Please note: Primary formats of the xml-file, which do not use the <dynamic_text>\<\dynamic_text> tags or the header section, will be supported further on !
The header section starts with <header> and is closed with <\header>. If you want to define a default language, use entry <default-language>. A default font which is assigned to a certain language, can be defined via entry <default-font>. These entries are optional. If they are missing, the dynamic text in the visualization will be displayed according to the local configuration settings of the visualization.
<header> |
|
|
|
|
|
<default-language> <language> </default- |
Default language; that means that if there is |
|
language> |
no text entry available for the currently set |
|
|
language, that text will be used which is |
|
|
found within the same text entry for the |
|
|
default language. If also for the default |
|
|
language no text is found, "<PREFIX> < |
|
|
ID>“ will be displayed. If multiple XML-files |
|
|
are used, thus providing multiple headers, |
|
|
only that header section will be regarded, |
|
|
which is read at last. So it is reasonable to |
|
|
use only one header section ! |
The |
|
language token must correspond which one |
|
|
of that used in the text entries (see below). |
|
|
|
|
<default-font> |
Default font for <language>: The given font |
|
|
(e.g. "Arial" will automatically be used |
|
|
for all elements, which display dynamic |
|
<language><language></language> |
texts in <language>. The language token |
|
must |
|
|
|
correspond which one of that used in the |
|
|
text entries (see below). |
|
<font-name><font></font-name> |
|
|
</default-font> |
|
|
<default-font> |
further default fonts for other languages |
|
<language>...... |
|
|
.... |
|
|
</default-font> |
|
|
</header> |
|
|
|
|
|
The list of assignments Prefix-ID-text starts with <text list> and ends with </text list>.
The CoDeSys Visualization |
2-53 |

2 - The Visualization Editor in CoDeSys
The particular text entries each start with <text prefix> and end with <\text>. A text entry which is assigned to a Prefix-ID-combination must contain the following lines:
<text prefix>= "<PREFIX> id="<ID>" |
"PREFIX" corresponds to the <PREFIX> |
|||
|
used in the visualization element |
|||
|
configuration |
(category |
Text); |
"ID" |
|
corresponds to the entry in category |
|||
|
'Variables', Textdisplay |
|
|
|
|
|
|||
<language> <!CDATA[<TEXT>]] </language> |
Use any string as an 'language' identifier |
|||
|
(e.g. "english"). This identifier then will be |
|||
|
displayed in the 'Settings' dialog, category |
|||
|
Language of the visualization element in |
|||
|
the selection list at 'Language'; instead of |
|||
|
"TEXT" insert any text which then will be |
|||
|
displayed instead of the above defined |
ID- |
||
|
prefix-combination in the visualization |
|||
|
element. |
|
|
|
|
|
|
|
|
</text> |
|
|
|
|
|
|
|
|
|
For each prefix-ID-combination at least for 1 language a text entry must be available.
e.g. <deu> in the file example shown below will indicate the start of the german version of a text, </deu> terminates the text.
Dynamic texts on the one hand can serve to display Texts in different languages, but of course on the other hand they also can be used to change the content of a text (same language) display dynamically.
Example:
1.In PLC_PRG define a variable ivar of type INT.
2.Configure a visualization element as follows:
3.In category Text in the Content field enter: "Achtung, %<ABC>"
4.In category Variables at Textdisplay enter: PLC_PRG.ivar
5.Create a xml-file, e.g. named dynamictext1.xml, using the above described syntax, which for this example might look as shown in the example below: The default language is "deu" (language identifier for "German"), the assigned default font is Arial, the default font for "eng" is Times New Roman. The dynamic texts are defined in German ("deu") and partially in English ("eng").
6.Open dialog Settings, category Language: Activate option Dynamic texts, add the file dynamictext1.xml, which you now have available on your computer, to the file list.
7.Go online with the project.
8.Set the language in the visualization settings to "deu". Set PLC_PRG.ivar to 2. In the visualization element the following text should be displayed: "Fehlertext deutsch zu Prefix ABC Fehler 2…". Set PLC_PRG.ivar to 1. The text should change to "aaa Fehlertext deutsch zu Prefix ABC Fehler 1". The text in both cases is displayed in Arial.
9.Now change the language settings in the visualization to "eng". Set PLC_PRG.ivar to 1. "aaa Errortext english to prefix ABC error 1". Set the variable to 2. For this combination no english text is available in the XML-file. Thus the corresponding entry which is defined for the default language (deu) will be displayed in font Arial: "Fehlertext deutsch zu Prefix ABC Fehler 2...".
(The change of language also could be managed by using the INTERN command 'LANGUAGE' by another visualization element.)
2-54 |
The CoDeSys Visualization |