Материал: m933302e
2 - The Visualization Editor in CoDeSys
Example: part of an XML-file for dynamic texts:
2.6Calling up language-dependent Online Help via a visualization element
The calling of a different Help file with a visualization element can be tied in with the language currently entered for the visualization. For this purpose, the command INTERN HELP must be entered for this element in the 'Configure element' dialog at the location 'Execute program', and a [VisuHelpfiles] section must be present in the CoDeSys .ini-file. Below this, the corresponding help files must be assigned to the languages available for selection in the visualization: e.g.:
[Visu-Helpfiles] German=C:\PROGRAMME\HELP_D.HLP English=C:\PROGRAMME\HELP_E.HLP
The CoDeSys Visualization |
2-55 |
2 - The Visualization Editor in CoDeSys
2.7Placeholder Concept
At each location in the configuration dialog at which variables or text are entered, a placeholder can be set in place of the respective variable or text. This makes sense if the visualization object is not to be used directly in the program, but is created to be inserted in other visualization objects as an "instance". When configuring such an Instance, the placeholders can be replaced with variable names or with text (see chapter 2.4.1, „Configuring an inserted visualization", there you also find an example for using placeholders).
Any string enclosed in two dollar signs ($) is a valid placeholder (e.g. $variable1$, variable$x$). For each placeholder a „value group" can be defined as an input specification in the 'Placeholder list' dialog (called from 'Extras' 'Placeholder list'). With one of these values you can replace the placeholder when configuring an instance of the visualization object. A placeholder list will be available in the instance to do this replacements.
'Extras' 'List of Placeholders...'
This list is used at two places in CoDeSys: to manage placeholders and to configure them:
1.primarily you use the list when configuring a visualization object, which later should be inserted, which means instanced, in other visualization(s). For this reason you will use placeholders instead of or additionally to variables and strings in the configuration dialogs. You can open the dialog 'Placeholders' by the command 'List of Placeholders' in the 'Extras' menu or in the context menu. The list shows three columns:
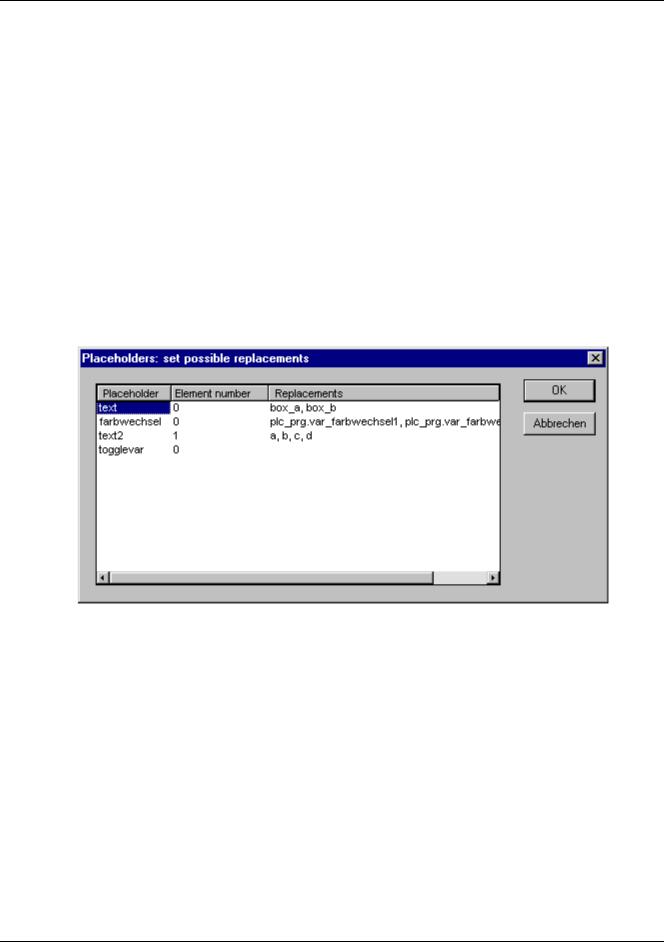
Placeholder list for input of possible replacements for the placeholders
Column Placeholder will list all placeholders, which are currently used in the configuration of the visualization object. Column Element number shows the elements which contain a placeholder. In column Replacements you can enter one or several strings (text, variable, expression) which you want to get available later when replacing a placeholder during the configuration of an instance of the visualization object. The elements of the selection must be entered separated by commas. If no or an impossible replacement string is specified, then the placeholder can be replaced with any desired text later during the configuration of the visualization's instance.
2.later you use the list of placeholders when configuring an instance of the above mentioned visualization object, that means after this object has been inserted (as an 'instance') in another visualization by the command 'Insert' 'Visualization'. For this purpose do the following to open the dialog: Select the inserted visualization, execute command 'Extras' 'Configure' and press button 'Placeholders' in Category 'Visualization'. In this case the dialog will only contain two columns:
2-56 |
The CoDeSys Visualization |
2 - The Visualization Editor in CoDeSys
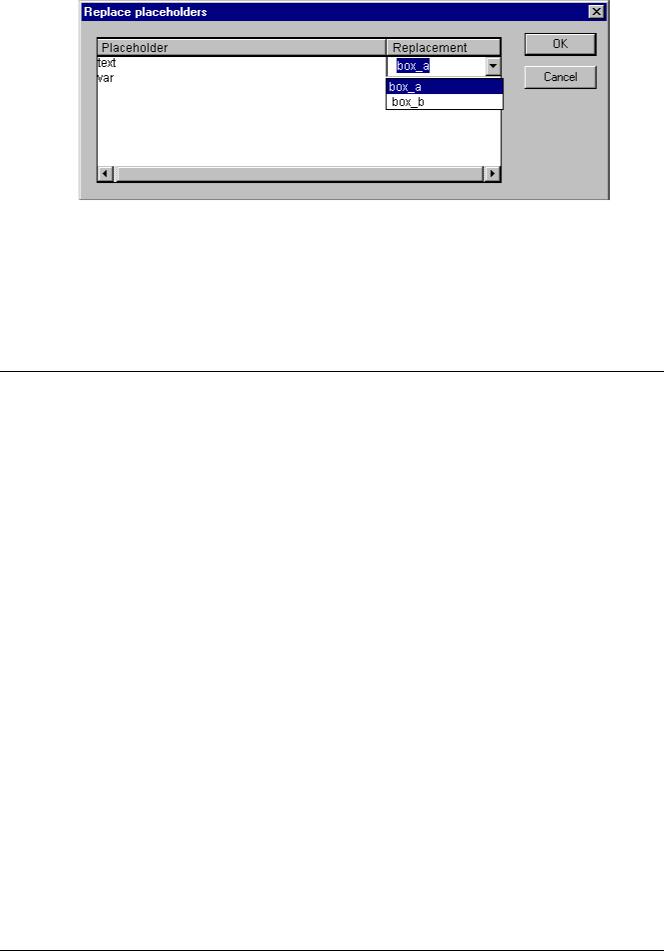
List of placeholders for replacing a placeholder in a visualization instance
Column Placeholder – like described above – shows all placeholders which have been defined for the primary visualization object. If additionally a selection of possible replacements had been defined, this list will now be available in column 'Replacement'. Select one of the entries to replace the placeholder in the present instance. If no replacements have been pre-defined then you can manually enter an expression or variable. For this purpose perform a mouse-click on the field in column Replacement to open an editor field.
2.8Visualization in Online Mode...
Regard the following items concerning a visualization in online mode:
oOrder of evaluation:
Dynamically defined element properties (by variables) will overwrite the (static) base settings defined by options in the configuration dialogs.
If an element property is defined by a "normal" project variable as well as by the component of a structure variable (Programability), then primarily the value of the project variable will be regarded.
A visualization can be configured in that way that in online mode it can be operated solely by inputs via keyboard. This is an important feature especially for using the visualization with CoDeSys HMI, as Targetor as Web-Visualization.
oThe configuration settings for Display, Frame and Language can also be edited in online mode.
oAs long as a visualization "instance" is not configured explicitly, the particular elements of the instance in online mode will react on inputs like those of the original visualization ("mother" of the instances).
oWhen you switch the language ('Extras' 'Settings') this will only effect the display in online mode.
o A visualization can be printed in online mode.
Operation over the keyboard - in online mode
In order to get independent from the mouse or a touch screen, it is useful to configure a visualization in a way that allows pure keyboard operation:
Per default the following key (combinations) will work in online mode anyway (no special configuration necessary):
Pressing the <Tabulator> key selects the first element in the element list for which an input is configured. Each subsequent pressing of the key moves one to the next element in the list. Pressing the key while keeping the <Shift> key depressed selects the previous element.
The CoDeSys Visualization |
2-57 |

2 - The Visualization Editor in CoDeSys
The arrow keys can be used to change from a selected element to a neighbouring one in any direction.
The <Space bar> is used to execute an activity on the selected visualization element. If the element is one which has a text output variable, a text input field will be opened which displays the text contents of the variable. Pressing the <Enter> key writes in this value.
Additional key (combinations) for the online operation can be defined in the configuration dialog 'Keyboard usage'. There also the keys <Tab>, <Space> and <Enter> can get assigned another functions than the above described standards.
The individual elements of instances behave in Online mode identically to the corresponding ones in the visualization that is instanced. They will therefore react the same way as individual elements to inputs and operation by mouse and keyboard; the display of tooltips in instances is also elementdependent. When processing the element list, as for instance when jumping from one input element to the next using the tabulator, the processing of all individual elements of a instance proceeds from the location of the instance in the element list before jumping to the next element of the list.
Note: Operation over the keyboard in online mode is of greatest significance, if the visualization should be used with CoDeSys HMI resp. as Target-Visualization or Web-Visualization !
'File' 'Print' in online mode
'File' 'Print'is used to print out the contents of the visualization window in online mode. Visualizations which stretch over the border of the window can lead to inconsistencies particularly when there are moving elements in the visualization.
2.9Visualizations in libraries...
Visualizations can also be stored in libraries and thus be made available to projects in the form of library POUs. They can be inserted as instances or they can be called up via the command „Zoom to vis." in the input configuration of another visualization which is part of the project.
Note: Visualizations used in a project must have unique names. It can be problematic if for instance a visualization from a library is called or referenced which has the same name as one present in the project. Because, in processing instances or visualization calls in the program, first the visualizations in the project, and only thereafter the ones in the loaded libraries will be implemented.
2-58 |
The CoDeSys Visualization |

3 - CoDeSys HMI
3 CoDeSys HMI
CoDeSys HMI is the run time system needed for the execution of the well known CoDeSys visualisation. This system enables the user to create an inexpensive software for operating machines and plants using the visualisations generated in CoDeSys.
CoDeSys HMI uses the already existent project file for the visualisation. Of course it is possible to protect the application program with a read-only protection. The masks then appear in the full-picture mode and merely the visualisation starting with the picture “PLC_VISU” is shown. All the other operational elements of CoDeSys like menus or the object organiser are not visible.
By seamlessly integrating the development platform for the visualisation masks into the PLC programming system CoDeSys HMI offers advantages other visualisations simply cannot come up to:
•A tag list of the variables to be used is not needed. It is possible to work directly with the CoDeSys variables.
•Variable values in input fields can be modified by expressions (e.g. “Variable1+ Variable2 * 12 + 5”)
•A mighty place-holder concept allows the user to create object-oriented masks. This means the user can build modules similar to the CoDeSys function blocks in the visualisation.
The CoDeSys functions “Sampling Trace“ and “read/write recipe“ are also available in CoDeSys HMI.
3.1Installation, Start and Operating
CoDeSys HMI can be installed with the standard CoDeSys setup. If no valid license is available, a time-limited demo version can be used.
CoDeSys HMI (CoDeSysHMI.exe) is started by a command line:
In each case at least the desired CoDeSys project has to be given in the command line. If no further parameters are set there, CoDeSys HMI automatically will start with a visualization POU named PLC_VISU (if existent in the project) and on that target or simulation mode, which was set when the project had been saved last.
Additionally as well the known command line and command file commands (see User Manual for CoDeSys) as the following special parameters can be used:
"/simulation" resp. "/target" |
Per default it will be started in that mode which was set when the |
|
project was saved last. Using the parameter "/simulation" resp. |
|
"/target" in the command line it can be set explicitly whether the |
|
project should run in simulation mode or on the target. |
|
|
/visu <visualization POU> |
If the project contains a visualization POU named PLC_VISU, it |
|
will start automatically with this one. If another POU should be the |
|
entrance, it has to be set in the command line with "/visu <name |
|
of visualization POU>". |
|
|
/visudownload |
Overrides the download lock: |
|
If the user tries to log in with a project, which is different to that on |
|
the PLC, per default a download of the new project (dialog) can |
|
be initiated. If however there is an entry "visudownload=no" in the |
|
codesys.ini file, then no download is possible. This lock can be |
|
overridden by the command line parameter "/visudownload". |
/visucompactload |
This parameter can be used for optimization at starting a project |
|
for which no download |
|
is required. If a download gets necessary anyway, e.g. effected by |
|
parameter "/visudownload", |
|
"/visucompactload" will be ignored. |
|
|
The CoDeSys Visualization |
3-1 |