Материал: m933302e
2 - The Visualization Editor in CoDeSys
Special input possibilities for operating versions
The CoDeSys visualization can target specifically be used with CoDeSys HMI or as Webor TargetVisualization as a mere operating interface. Then no menus and status and tool bars will be available to the user and no possibility to modify the code.
Thus, when a visualization is created with CoDeSys for the purpose of being used as a 'operating version' the principal control and monitoring functions in a project must be assigned to visualization elements thus making them accessible via mouse click or keyboard in Online mode.
See in the following some special input possibilities to configure visualization elements for the purpose of being used in CoDeSys HMI. They are available in the configuration dialog for a visualization element:
Enter internal commands in the field Execute program in the category Input according to the following syntax (The dialog 'Configure Programs' is available for this purpose):
INTERN <COMMAND> [PARAMETER]*
The following table shows the available internal commands. Some of them expect to receive several parameters, which are then entered separated by spaces. Optional parameters are enclosed in square brackets. For those commands which require that a Watch list be specified, a placeholder can be used instead of the direct name. If you enter several commands for one element, these are separated by commas.
Command |
The equivalent in the Explanation |
|
programming version |
|
of CoDeSys |
ASSIGN |
Assignment |
A variable or expression gets assigned to another |
<Variable>:=<Expression> |
|
variable. |
|
|
Example: |
|
|
INTERN ASSIGN PLC_PRG.ivar1:=PROG1.ivar+12; |
PROGRAM <Path |
Program call |
The program will be executed. |
executable program> [Path |
|
Example: |
of the file to be opened] |
|
INTERN PROGRAM C:\programms\notepad.exe text.txt |
LANGUAGEDIALOG |
visualization settings |
The dialog for visualization settings which includes |
|
|
the category language gets opened. |
LANGUAGE <language |
visualization settings, |
The desired language is set without using the |
identifier as used in the |
Language |
dialog for visualization settings. |
currently set language file> |
|
|
DEFINERECEIPT name |
Select watch lists |
A watch list is selected from the receipt manager |
|
|
which enters your name (name) when the |
|
|
command is given. The variables in this watch list |
|
|
are registered and displayed. |
READRECEIPT name |
'Read receipt' |
In the defined watch list the pre-definition of the |
|
|
variables will be replaced by the current values. |
WRITERECEIPT name |
'Write receipts' |
The name of a watch list of the receipt manager is |
|
|
expected. The receipt of this watch list will be |
|
|
written. A previous execution of DEFINERECEIPT |
|
|
is not necessary. |
SAVEWATCH |
'Save watch list' |
The receipt will be read into the current watch list |
|
|
which will be stored in a file. Important: call a |
|
|
previous DEFINERECEIPT to define the current |
|
|
receipt ! |
LOADWATCH |
'Load watch list'+ |
The standard window ‚File open' appears, from |
|
'Write receipt' |
which a previously stored receipt can be selected. |
|
|
This receipt will be immediately written into the |
|
|
controller system. |
The CoDeSys Visualization |
2-45 |
2 - The Visualization Editor in CoDeSys
CHANGEUSERLEVEL |
- |
|
A dialog for setting the user group level will open. |
|
|
|
The eight CoDeSys user group levels are offered |
|
|
|
for selection. |
CHANGEPASSWORD |
cp. 'Project' 'User |
A dialog for changing the user group password will |
|
|
Group Passwords...' |
appear. |
|
SAVEPROJECT |
'File' 'Save' |
The project will be saved. |
|
EXITPROGRAM |
'File' 'Close' |
The program will be exited. |
|
'File' 'Print' |
The current visualization will be printed out online. |
||
HELP <name of help file> |
Call of a help file |
Depending on which language is set for the |
|
|
|
|
visualization, a help file will be called which is |
|
|
|
entered for that language in the CoDeSys.ini file. |
|
|
|
(see 'Extras' 'settings') |
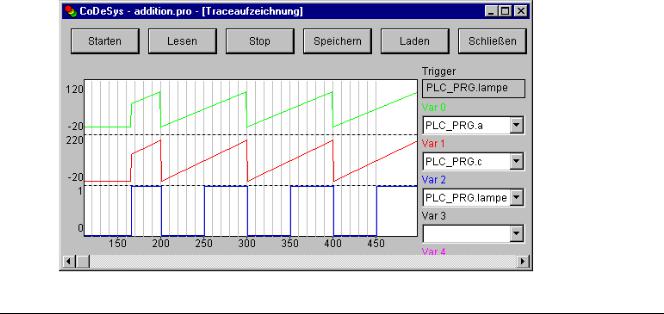
TRACE |
Resources, |
The window for trace recording (Sampling Trace) |
|
|
Sampling Trace |
will be opened. |
|
|
|
|
The menu commands Trace Start, Read, Stop, |
|
|
|
Save, Load which are available in the full version |
|
|
|
of CoDeSys are available in this window. |
CNC |
Resources, |
If there is a CNC program list available in the |
|
|
CNC |
|
project (Resources), the CNC editor will be |
|
|
|
opened. |
|
|
|
As soon as the CNC editor will be closed again, it |
|
|
|
will be returned to the visualization. |
only for usage in a Web-Visualization: |
|
||
INTERN LINK <URL> |
|
The Web-Visualization will switch over within the browser to the |
|
|
|
defined URL (Unified resource location); e.g.."INTERN LINK |
|
|
|
http://www.3s-software.com" |
|
INTERN LINK <HTTP file path> |
The defined |
file will be opened; e.g. "INTERN LINK |
|
|
|
http://localhost:8080/test.pdf" |
|
INTERN LINK mailto:<EMail- |
The entry mask for sending an EMail to the defined address will |
||
Adresse> |
|
be opened; e.g. " INTERN LINK |
|
|
|
mailto:s.sdfjksk@companyxy.com" |
|
Dialog for the trace recording in the operating version
2-46 |
The CoDeSys Visualization |
2 - The Visualization Editor in CoDeSys
2.4.2Visualization Object, Configure...
Besides the configuration of the individual visualization elements also the visualization object on the whole can get configured. This is possible concerning the settings for frame, language, grid, background etc. as well as the assignment of special hotkey definitions (keyboard usage), which should be valid for exactly one visualization object.
'Extras' 'Settings' / Display, Frame, Grid, Language
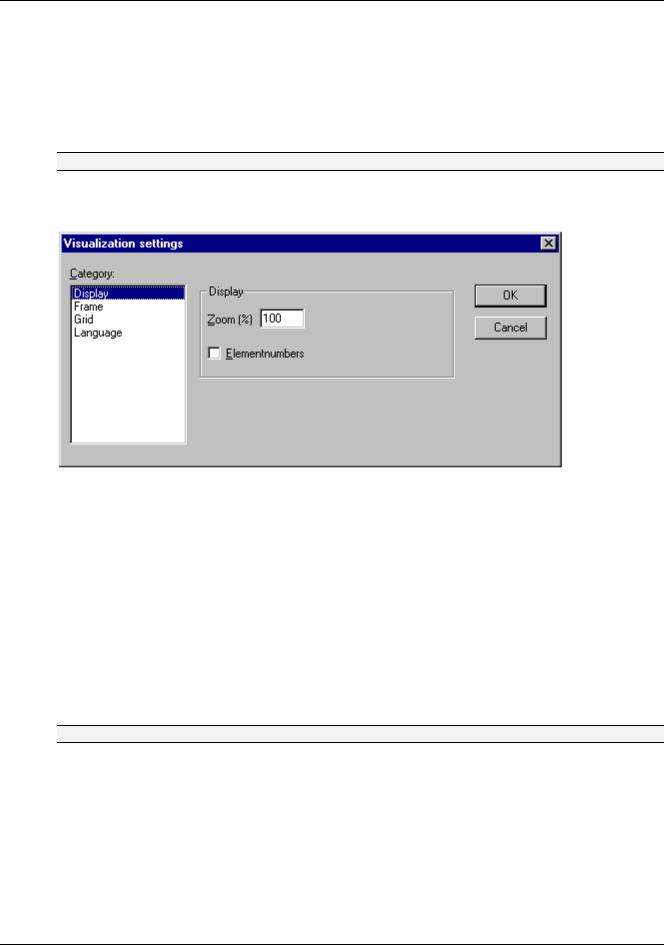
When this command is used, a dialog box will open in which you can make certain settings that affect the visualization.
Note: The categories Display, Frame and Language also can be edited in the online mode.
Category Display : Enter a zoom factor into the field Zoom of between 10 and 500 % in order to increase or decrease the size of the visualization display.
Setting dialog for visualizations (Category Display)
Category Frame: If Auto-scrolling is selected, the visible portion of the visualization window will move automatically when you reach the edge while drawing or moving a visualization element. If Best fit in Online mode is selected, the entire visualization including all elements will be shown in the window in Online mode regardless of the size of the window. When Include Background Bitmap is selected, the background bitmap will be fitted into the window as well, otherwise only the elements will be considered.
Category Grid: Define here whether the grid points are visible in the offline mode, whereby the spacing between the visible points is at least 10 even if the entered size is smaller than that. In this case the grid points only appear with a spacing which is a multiple of the entered size. Selecting Active causes the elements to be placed on the snap grid points when they are drawn and moved. The spacing of the grid points is set in the field Size.
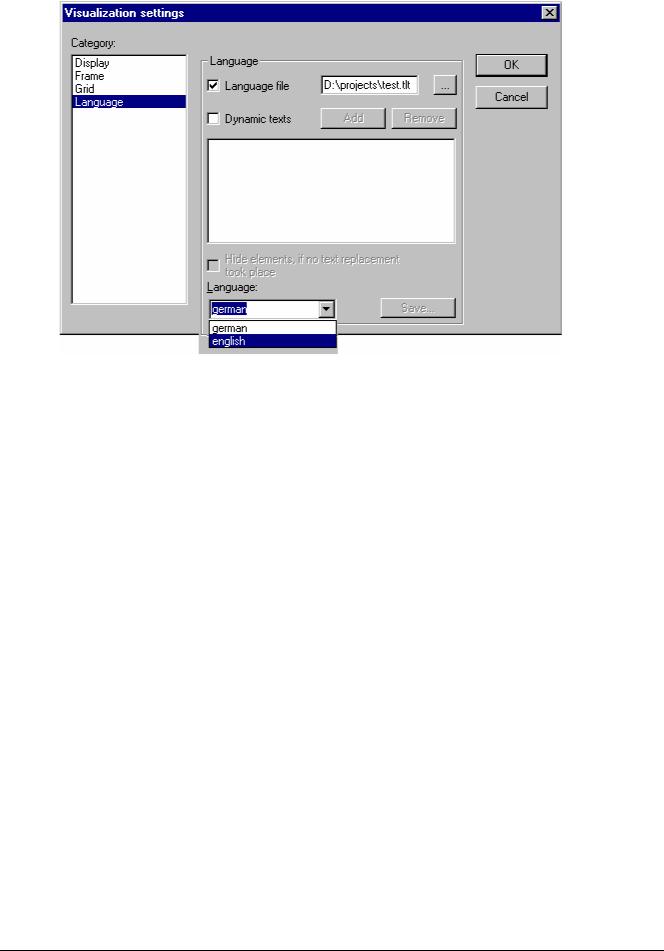
Category Language: Here you can specify in which national language the text that you assigned to an element in the Text and Text for Tooltip options should be displayed. Additionally the option 'Dynamic Texts' allows a dynamic change of the displayed text.
Note: The text display changes only in Online mode!
For a non-dynamic switch of the used language a language file can be used (project translation file *.tlt or *.txt, resp. a special visualization language file *vis).
Alternatively dynamic texts can be used. Those allow to switch between different text version in the display of a visualization element, inclusively the change of language.
Language file:
In order to select a translation or language file, activate the Language file option in the dialog and enter in the input field next to it the appropriate file path, or obtain the help of the standard file opening
dialog via the  button.
The CoDeSys Visualization |
2-47 |
2 - The Visualization Editor in CoDeSys
Dialog for selection of a language file for a visualization
In the selection window under Language you can now select among the options German and English in the example shown here.
Regarding creating a translation file *.tlt, please see 'Project' 'Translate into other languages'.
For creating a special language file *.vis for the visualization, see here (This option is retained for reasons of compatibility with projects created under Version 2.1.): Creating a *.vis language file:
In the selection window under Language you can now select among the options German and English in the example shown here.
Regarding creating a translation file *.tlt, please see 'Project' 'Translate into other anguages'.
For creating a special language file *.vis for the visualization, see here (This option is retained for reasons of compatibility with projects created under Version 2.1.):
Creating a *.vis language file:
In order to set up a new *.vis language file for the visualization, proceed as follows:
Open likewise the Settings Visualization dialog, Language category. Choose option language file. In the associate input field enter where you want to store the file. The extension is .vis. You also can use the dialog 'Open file' by pressing the button. If a language file with the extension .vis is already present, it will be offered to you here.
In the input field next to Language you fill in a keyword for the language which is currently used in the visualization, i.e."german" (or "D"). then press the button Save. A file with the extension .vis will be created, which now can be edited by a normal text editor. For example you can open the file by NOTEPAD:
2-48 |
The CoDeSys Visualization |

2 - The Visualization Editor in CoDeSys
Example of a language file for a visualisation (Category Language)
You get a list of the text variables for the language currently used in the visualization. It includes a reference to the title of this list, for example "1=german" as reference to the title [german]. You can extend the list by copying all lines, then replacing the German by English text and setting a new title [english]. Beyond the line 1=german you accordingly have to add 2=english.
To view the visualization in one of the prepared languages, open the dialog Language again. In the option field beyond Language now you can choose between german and english (for the example described above).
Dynamic texts:
Dynamic texts allow to switch between different text versions for a visualization elements. The text version is controlled by a Prefix-ID-combination, which is assigned to the text in a XML-file and which can be defined by a project variable (see Chapter 2.5).
'Extras' 'Select Background Bitmap'
Use this command to open the dialog box for selecting files. Select a file with the extension "*.bmp". The selected bitmap will then appear as the background in your visualization.
The bitmap can be removed with the command 'Extras' 'Clear Background Bitmap'.
'Extras' 'Clear Background Bitmap'
Use this command to remove the bitmap as the background for the current visualization.
You can use the command 'Extras' 'Select Background Bitmap' to select a bitmap for the current visualization.
'Extras' 'Keyboard usage'
The use of hotkeys can optimize the pure keyboard operation of a visualization.
In the configuration of a visualization object you can define hotkeys which will cause actions like visualization elements do. For example you could define that – if visualization 'xy' is active – in online mode the hotkey <Strg><F2> will stop the program, which also will happen as soon as element 'z' of visu 'xy' gets an input (by mouse-click or via touch screen).
Anyway per default the keys <Tabulator> <Space> <Enter> will work in that way that in online mode each element of a visualization can be selected and activated.
The dialog 'Keyboard usage: set possible keystrokes' can be called in the menu 'Extras' or in the context menu:
The CoDeSys Visualization |
2-49 |