Материал: m933302e
2 - The Visualization Editor in CoDeSys
Use the Undo and Redo buttons to undo or restore changes that have been made just as you would do with the commands 'Edit' 'Undo' and 'Edit' 'Redo' . In the dialog box, you can observe the changes that are being made.
Click on OK to close the dialog box and confirm the changes. Use Configure to get the configuration dialog for the element.
Status Bar in the Visualization
If a visualization has the focus, the current X and Y position of the mouse cursor in pixels relative to the upper left corner of the image is displayed in the status bar. If the mouse pointer is located on an Element, or if the element is being processed, then the number of the element will be displayed. If you have selected an element to insert, then this element will also appear (for example, Rectangle).
2.4Visualization, Configure - Overview
When configuring a visualization you have to distinguish between the configuration a particular graphic element and the visualization object as a whole. Correspondingly a different selection of configuration dialogs will be available, which can be opened by the command 'Configure' from Menu 'Extras' resp. from the context menu.
In this dialogs the properties of an element or object are set either by activating options or dynamically by inserting project variables. Besides that the properties can be programmed via the components of a structure variable, which can be defined for each visualization element.
Regard the order of analysis, which will be followed in online mode:
-The values which are given dynamically, i.e. via project variables, will overwrite the fix parameters defined for the same property.
-If an element property is defined by a "normal" project variable as well as by the component of a structure variable, then in online mode primarily the value of the project variable will be regarded.
Please regard the possibility of using Placeholders as well as the special input possibilities which are useful if the visualization should be used in CoDeSys HMI resp. as Target or Web-visualization , that means if the visualization serves as the only user interface for a PLC program (see also: INTERN in category 'Input' of the configuration dialogs, Keyboard usage)
Placeholders
At each location in the configuration dialog at which variables or text are entered, a placeholder can be set in place of the respective variable or text. This makes sense if the visualization object is not to be used directly in the program, but is created to be inserted in other visualization objects as an "instance". When configuring such an Instance, the placeholders can be replaced with variable names or with text.
See chapter 2.7 for the placeholder concept.
2.4.1Visualization Elements, Configure...
'Extras' 'Configure'
With this command, the 'Configure element' dialog opens for configuring the selected visualization element (see Select visualization element). You are given the dialog box when you double-click on the element.
Select a category in the left area of the dialog box (available categories depending on element type) and fill out the requested information in the right area. This has to be done by activating options resp. by inserting the name of valid variables, whose values should define the property of the element.
2-10 |
The CoDeSys Visualization |
2 - The Visualization Editor in CoDeSys
Note: There are also configuration dialogs available for a group of elements. Regard that the settings will be valid for the "element" group. If you want to configure the particular elements of the group, you have to resolve the group.
Note: If you have defined an element property by a "static" setting as well as dynamically by a variable, then in online mode the variable will overwrite the static value (Example: "Alarm color Inside" can be defined statically in category 'Color' and additionally dynamically in category 'Colorvariables' by a variable). If the setting is controlled by a "normal" project variable as well as by a structure variable, then the value of structure variable also will be overwritten by the "normal" project variable.
Please regard: Meter, Bar Display and Histogram must be re-grouped before !
At locations in the element configuration where variables are operative, the following Entries are possible:
•Variable names, for which input assistant is available
•Expressions which are assembled from component accesses, field accesses with constant index, variables and direct addresses.
•Operators and constants, which can be combined at will with the aforementioned expressions.
•Placeholders instead of variable names or text strings
Examples of permissible expressions:
x + y 100*PLC_PRG.a TRUE
NOT PLC_PRG.b
9*sin(x + 100)+cos(y+100)
Function calls are not possible. Invalid expressions result in an error message on login („Invalid Watch expression..."). Examples of invalid expressions: fun(88), a := 9, RETURN.
There are two possible ways in the configuration dialogs to write global variables: „.globvar" and „globvar" are equivalent. The style with a dot (which is that used in the Watchand Receipt Manager) is not allowed within an assembled expression, however.
Regard also the possibility of using Placeholders (Chapter 2.4.1).
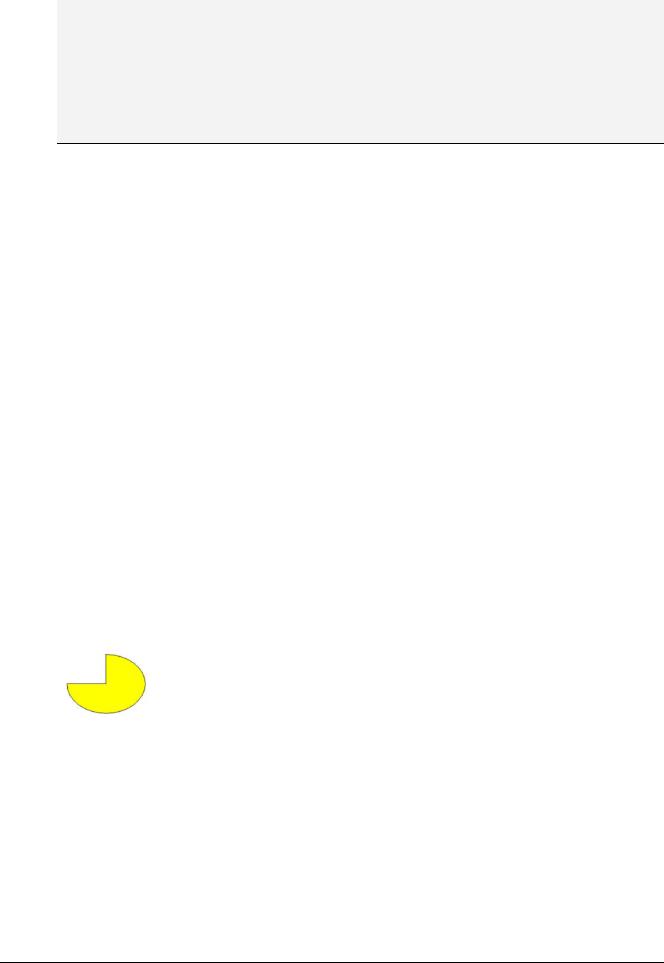
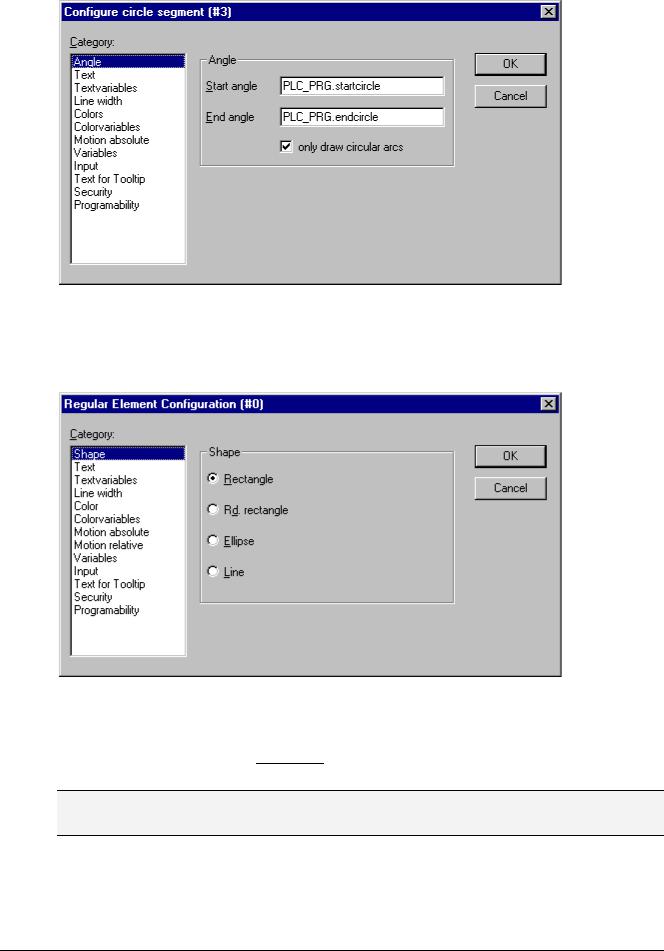
Angle
In the configuration dialog 'Configure Pie' in the Angle category you can each enter a value or a variable defining the start angle and the end angle of the sector element in degrees. The sector will be drawn clockwise from the start angle position to the end angle position.
Example:
Enter start angle: "90", end angle: "180"
The CoDeSys Visualization |
2-11 |
2 - The Visualization Editor in CoDeSys
Dialog for Configuring a Pie
Shape
In the visualization element configuration dialog box, you among Rectangle, Rounded Rectangle, Line and Ellipse
The form will change into the size already set.
can select in the Shape category from respectively Polygon, Line and Curve.
Dialog Box for Configuring Visualization Elements (Shape Category)
Text
In the dialog for configuring visualization elements, you can specify a text for the element in the Text category. This can be entered directly or/and a variable can be defined which will determine the text string. The usage of placeholders is possible. Also the default settings for font and alignment are done here.
Note: As soon as text parameters are additionally provided dynamically, which means by a system or structure variable (see also below, category 'Text variables' resp. 'Programmability'), the static definitions which are done in the currently opened dialog , will be overwritten !
In case of multiple definition of an element property consider the specific order of precedence concerning according to which a value might be overwritten in online mode by another.
2-12 |
The CoDeSys Visualization |
2 - The Visualization Editor in CoDeSys
Enter the text in the Content field. With the key combination <Crtl>+<Enter> you can insert line breaks, with <Crtl>+<Tab>, tab stops. Besides the input of a pure text string you can use the following formatting sequences:
•If you include "%s "into the text, then this location, in Online mode, will be replaced by the value of the variable from the Text Output field of the Variables category. You also can use a formatting string, which conforms with the standard C-library function 'sprintf':
Character |
Argument / Output as |
|
|
d,i |
Decimal number |
|
|
o |
Unsigned octal number (without leading zerol) |
|
|
x |
Unsigned hexadecimal number (without leading 0x) |
|
|
u |
Unsigned decimal number |
|
|
c |
Single character |
|
|
s |
String |
|
|
f |
REAL-values [-]m.dddddd, whereby the accuracy defines the number |
|
of d's (Default is 6). |
|
|
The value of the variable will be displayed correspondingly in online mode. You can enter any IEC-conforming format strings, which fit to the type of the used variable.
Attention: It is not checked whether the type which is used in the formatting string matches with the type of the variable which is defined in the 'Text Output' field !
Example: |
|
|
Input in the 'Content' field: |
Fill level |
%2.5f mm |
Input in the 'Text Output' field e.g.: |
fvar1 (REAL variable) |
|
Î Output in online mode e.g.: |
Fill level |
32.8999 mm |
•If you enter "%t ", followed by a certain sequence of special placeholders, then this location will be replaced in Online mode by the system time. The placeholders define the display format, see the following table. Attention: Do not insert any other characters before %t in the 'Content' field (in contrast this is allowed for e.g. "%s", see above)
%a |
Abbreviated weekday name |
|
|
|
|
%A |
Full weekday name |
|
|
|
|
%b |
Abbreviated month name |
|
|
|
|
%B |
Full month name |
|
|
|
|
%c |
Date and time representation appropriate for locale |
|
|
|
|
%d |
Day of month as decimal number (01 – 31) |
|
|
|
|
%H |
Hour in 24-hour format (00 – 23) |
|
|
|
|
%I |
Hour in 12-hour format (01 – 12) |
|
|
|
|
%j |
Day of year as decimal number (001 – 366) |
|
|
|
|
%m |
Month as decimal number (01 – 12) |
|
|
|
|
%M |
Minute as decimal number (00 – 59) |
|
|
|
|
%p |
Current locale’s A.M./P.M. indicator for 12-hour clock |
|
|
|
The CoDeSys Visualization |
2-13 |
|
2 - The Visualization Editor in CoDeSys |
|
|
%S |
Second as decimal number (00 – 59) |
|
|
%U |
Week of year as decimal number, with Sunday as first day of week (00 – |
|
53) |
|
|
%w |
Weekday as decimal number (0 – 6; Sunday is 0) |
|
|
%W |
Week of year as decimal number, with Monday as first day of week (00 – |
|
53) |
|
|
%x |
Date representation for current locale |
|
|
%X |
Time representation for current locale |
|
|
%y |
Year without century, as decimal number (00 – 99) |
|
|
%Y |
Year with century, as decimal number |
|
|
%z, |
Time-zone name or abbreviation; no characters if time zone is unknown |
%Z |
|
|
|
%% |
Percent sign |
|
|
Examples:
%t%a %b %d.%m.%y %H:%M:%S
-> Display in online mode: Wed Aug 28.08.02 16:32:45
Between the placeholders you can insert any text strings:
%Today is %d.%m.%y
-> Display in online mode: Today is 28.08.02
Note: If a text string is to be transferred into a translation file, which will then be used in Online mode to enable switching into another national language, it must be delimited at the beginning and end by #.
Examples: "#Pump 1#" or else even "#Pump# 1"
The second case might for example, in the event of multiple occurrences of the text Pump (Pump 1, Pump 2, etc.), prevent multiple appearances in the translation.
•If you include" %<PREFIX>" into the text, you can enter instead of "PREFIX" a certain string, which will serve as an identifier concerning the use of dynamic texts. The prefix will be used together with an ID number, which is to be defined in the 'Variables' category of the configuration dialog in field 'Textdisplay'. The combination references to a certain text, which is contained in a xml-file listing all possible dynamic texts.Thus at run time the text which is indicated by the current ID-Prefix- combination will be displayed. For further information see also the description of 'Settings', category Language.
The configured text will appear online in the prescribed alignment within the element: horizontally left, center or right and vertically top, center or bottom.
If you use the Font button, a dialog box for selection of the font will appear. Select the desired font and confirm the dialog with OK. With the Standard-Font button you can set the font that is selected in the project options ('Project' 'Options' 'Editor'). If the font is changed there, then this font will be displayed in all elements except in those elements for which another font has explicitly been selected by using the Font button.
2-14 |
The CoDeSys Visualization |